“I want to watch my blu-ray movies on Macbook for killing my time on a long travel, but the VLC player on my Macbook can not play the blu-ray. So I searched online for the reason and I knew that I had to rip blu-ray to VLC player supported formats. While, I am not a computerman and I can not understand how to do it. Can anyone tell me how to rip the blu-ray videos to help me play Blu-ray with VLC player on Macbook?” I saw this question from Yahoo Answers and I believe there are still someone have the same problem like him. So here I would like to analyze the reasons and solve the problem.

VLC, powerful multi-functional media player software, can run on Mac OS X, Windows, Linux, etc. which is widely used now. It supports various audio and video formats like MP4, MKV, MPEG-1, MPEG-2, MPEG-4, DivX and DVD/VCD etc. It can also support Blu-ray, but there are only some old Blu-ray discs can be ripped. So, this article will provide you three ways to help you play all the Blu-ray discs with VLC player on Macbook.
1. Upgrade VLC Media Player to 2.0 or later version.
It is the easiest way for you. As far as we know, only the VLC Media Player 2.0 or later version can rip Blu-ray discs for they come with multiple fixes for Blu-ray discs playback.
2. Use keys database and AACS dynamic library to play Blu-ray on VLC.
If you have upgraded VLC Media Player to 2.0 or later version and still can not play Blu-ray discs with VLC player on Macbook. Then you can try this way.
Download the KEYS DATABASE(KEYDB.cfg) and AACS DYNAMIC LIBRARY(libaacs.dll for Windows or libaacs.dylib for Mac).
For Windows Users:
1.KEYS DATABASSE
*open your user area (“C:\Users\your username\AppData”)

* Enable view hidden files and folders (Under Folder Options – View tab then select “show hidden files…”->select ok)

* Open “AppData” directory or create a folder and name it aacs
* Place the downloaded KEYDB.cfg file in this folder directly.
2. AACS DYNAMIC LIBRARY
* Go to “c:\Program Files” [Or "c:\Program Files (x86)" if running 64bit]
* Navigate to “VLC” directory, and move the libaacs.dll file into it.
Now, you can easily play Blu-Ray disc with VLC on Windows for free. Note: The latest VLC still doesn’t have menu support yet.
For Mac users:
You may navigate the corresponding folder and move into the necessary files as follow. Go to: http://vlc-bluray.whoknowsmy.name/, get the necessary files.
1. KEYS Database
Mac OS: put it in ~/Library/Preferences/aacs/ (create it if it does not exist)
2.AACS Dynamic Library
Mac OS: right-click on VLC, choose “Show package contents” and put that file in Contents/MacOS/lib/
Tip: VLC does not yet support Blu-ray menus so you must manually select title to play. And not all
Blu-ray movies are supported.
3. Convert blu-ray to VLC player supported formats.
Some people responded that they have followed all the instructions, but they still can’t play Blu-ray disc with VLC player on Macbook. If so, maybe you should consider to use a blu-ray ripper to convert blu-ray to VLC player supported format like MP4. Here I suggested you to usePavtube BDMagic for Mac to rip your blu-ray. As it can copy all kinds of blu-ray to almost all mainstream formats, such as MP4, MKV, MOV. For 2.2.1 VLC users, you can rip Blu-ray to H.265/HEVC MP4 to enjoy more high-quality movies with smaller size. What’s more, this software has updated to support the newest Mac OS X El Capitan. See the review for more information.
Free download and install:


Other Download:
- Pavtube old official address: http://www.pavtube.cn/blu-ray-ripper-mac/
- Cnet Download: http://download.cnet.com/Pavtube-BDMagic/3000-7970_4-76177782.html
Steps to rip blu-ray to H.265 MP4 for playing on VLC player.
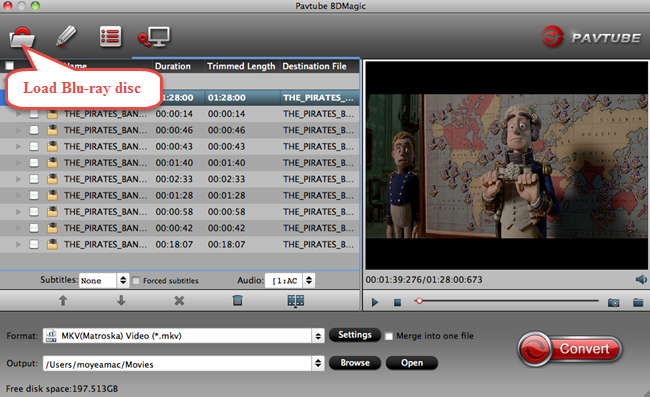
Step 1. Load Blu-ray discs
Click the "Folder" icon on the top menu bar to load your Blu-ray disc to the program
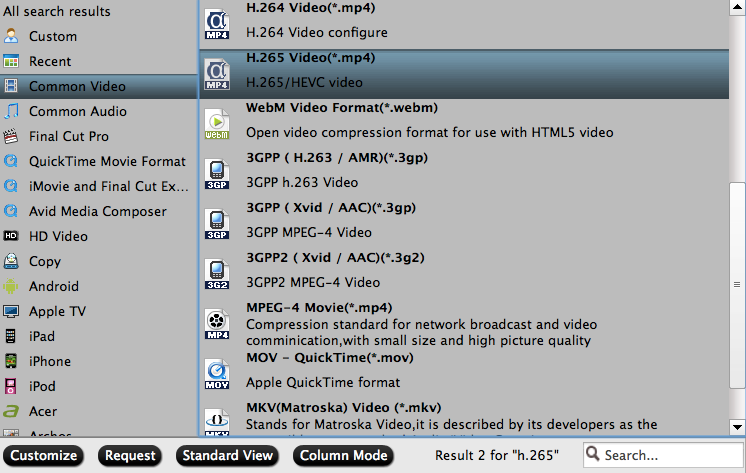
Step 2: Set output format
For the user with VLC 2.0 or later version can define the output format as "H.265 Video (*.mp4)" from the "Format > Common Video" bar extended lists. But, if your VLC has not upgraded to 2.0 or later version, then you should choose the output format as H.264 Video (*.mp4)".
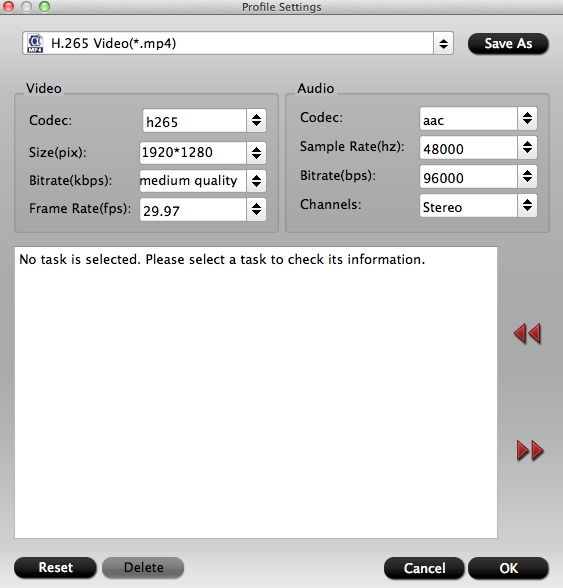
Step 3: Customize output video and audio quality
Adjust the output video and audio codec, size, bit rate, frame rate, sample rate, channels according to your own needs and preference.
Step 4: Start to convert
Start Blu-ray to H.265 MP4 conversion process by hitting the right-bottom conversion button. When the conversion is done, you can enjoy you blu-ray movies with VLC player on Macbook.
If you are a Windows user, you can download Pavtube BDMagic to play your blu-ray videos with VLC on Macbook.
Now, in order to return our customers’ supports, we give a big discount in Pavtube Christmas Coupon. Come get it now!!!
Related Articles:
- Top 5 Best Blu-ray Ripper for Mac Including macOS Sierra Review
- Top 5 Blu-ray Ripping Programs Review 2016
- 2016 Top 5 Best DVD Ripper Program Review
- Transfer M4V movie from iTunes library to Galaxy Tab S for playing
- Can't Post MP4 video to Instagram? Solved!
- Vudu Movies DRM Removal - Convert Vudu Movies on TV
- How to Get all DVDs into Synology NAS drive for Streaming
- Rip Blu-ray 3D to MKV Full HD 3D with MakeMKV
- How Can I Install QuickTime 6 Pro For Mac OS X El Capitan
- Two ways to Insert/Embed FLV to PowerPoint Slide for your Presentation


